
Adobe Illustrator is a
professional program for creating and editing vector graphics for printing
and for the web. In addition to the usual standard graphic editing tools,
the applications can be edited and equipped with the help of various
special functions such as 3D, transparency, rollover or gradient effects
as well as the Adobe Photoshop filters that can be used.
1. Vector Graphic (AI) VS Pixel Map (PS):
1.1 Vector Graphic:
The vector diagram is composed of paths and anchor points. The main factors that determine the size of the picture are the various information contained in the path and anchor points. The most remarkable feature of vector graphics is that no matter how many times you zoom in, the edges of the picture are still clear and smooth.
1.2 Pixel Map:
Raster images are composed of each pixel. The main factors that determine the size of the pixel map are the number of pixels and the color information contained in the pixels. The most significant feature of the pixel map is that after zooming in to the maximum, you will see a small grid of solid colors, and this grid is the pixel.
2. Adobe Illustrator:
Adobe Illustrator is a vector-based graphics production software launched by Adobe Systems. It was originally designed and developed for Apple's Macintosh computer in 1986 and was released in January 1987. Prior to this, it was just Adobe's internal font development and PostScript editing software.
Illustrator is a very good vector graphics processing tool, the software is mainly used in printing and publishing, poster book layout, professional illustration, multimedia image processing, and internet page production, etc. It can also provide high precision and control for line drafts, suitable for producing any small design to a large complex project.
| Adobe Illustrator |
Adobe Illustrator, as the world's most famous vector graphics software, with its powerful functions and considerate user interface, has occupied most of the global vector editing software share.
Especially based on the use of Adobe's patented PostScript technology, Illustrator has completely occupied the professional printing and publishing field. Whether it is a designer of a line draft and a professional illustrator, an artist who produces multimedia images, or a producer of internet pages or online content, after using Illustrator, you will find that its powerful functions and simple interface design style can only be compared with freehand .
2. Illustrator Features:
Illustrator
is an important part of Creative Suite. It has a similar interface with
the brother software bitmap graphics processing software Photoshop and
can share some plug-ins and functions to achieve a seamless connection.
At the same time, it can also export files to flash format. Therefore, adobe products can be connected to flash through illustrator.
The biggest feature is the use of the pen tool, which makes it easy to operate the vector drawing. It also integrates functions such as word processing and coloring. It is not only used in illustration production but also widely used in the design and production of printed products (such as advertising flyers and brochures). In fact, it has become the default standard in the desktop publishing (DTP) industry. Its main competitor is Macromedia Freehand; but on April 18, 2005, Macromedia was acquired by Adobe.
In this software, the pen tool method is realized by setting the "anchor point" and "direction line" through the "pen tool". Ordinary users feel uncomfortable at first and need some practice. But once mastered, you can draw various lines according to your preferences, and it is intuitive and reliable.
When entering a program like Adobe Illustrator, the user interface can be overwhelming. Since you do not have to know all the tools to get started, I have put together an overview of the really most important tools and functions.
2.1 Toolbar:

1-Selection tool (keyboard: V): Responsible for the "rough" (selection of entire objects, change in size, proportion, position);
shift + click: selection of several objects.
shift + click: selection of several objects.
2-Direct selection tool (keyboard: A). Responsible for the "fine" (selection of individual anchor points or path segments);
shift + click: select multiple points or segments.
3-Pen tool (keyboard: P) "see drawing tools below".
4-Curve plotter: Adds an anchor point to an existing path, by clicking the corresponding path segment can be dragged directly into a curve.
5-Text tool (T). A simple click on a free area of the drawing area creates point text. This runs horizontally for any length of time. In contrast, you create a text frame by clicking and dragging (such as in InDesign), in Illustrator this text type is called area text. Further formatting options under Font > Area Text Options. By pressing the ESC key you leave the text tool.
6- Rectangle tool (M). Many more complex shapes can be created by combining basic shapes such as rectangles and ellipses.
7-Turning tool (R). The previously highlighted object shows a crosshair when the rotate tool is activated. This is the origin for the rotation, with a click it can be set anywhere on the drawing area. Pressing the Alt key opens a dialog that can be used to precisely control the rotation and: There is also the important option here of making a copy of the original object while rotating.
8- Scale tool (S). Basically the same options as with the turning tool.
9- Pipette tool (I). Transfers formatting from/to any object.
10- Hand tool (H). For navigation in the document.
11- Zoom tool (Z). To zoom in on details, pressing the alt key changes the behavior for zooming out.
12- Formatting area. Explanation under 4. Formatting area.
2.2 Drawing Tools:
 |
| Pen Tool |
Many tools in the tool panel have a small white triangle at the bottom right. This is an indication of other tools. Under the actual pen tool, other tools can be selected with which paths can be further processed. Illustrator (and actually all DTP programs) knows three types of path points.
- Endpoints. If a path does not have a closed shape, the path has two endpoints;
- Key points. If a curve is to be angular, an anchor point is simply set with one click. The next anchor point then forms a straight line between the last and the new point;
- Curve points. To draw a curve, simply draw a so-called grip line from the anchor point after setting an anchor point. The length and angle of this handle line define the course of the curve at this anchor point.
2.3 Molding Tools:
 Often complex shapes can be created by combining the various basic shapes.
 The following important additional keys make it easier to create shapes:
3- Instead of the x button, you can also use this small button. But why should you ever want that? The x key is literally more obvious. (Sure: the shortcut keys only work, of course, if you are not currently using the text tool. Then just press the ESC key - then use the desired shortcut.)
4- Clicking this small button resets the current formatting to the standard formatting (black outline, white area). It's faster with shift + x.
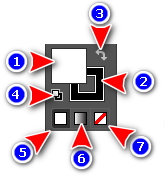
6- Area or contour, which is in the upper area in front, is formatted with a gradient by clicking on this button. Shortcut: (.)
7- Area or contour, which is in the upper area in front, is formatted without color by clicking on this button. Shortcut: (#)
1- Unite: individual paths are combined to form a larger path. The pathfinder functions only work if several paths are marked and they overlap ...
- Hold shift key while dragging: Rectangle and ellipse become square and circle
- Hold the Alt key while opening: the shapes are drawn from the center. shift and alt keys can also be used in combination: this allows you to draw a perfect circle.
- Press the spacebar when creating a shape: the shape can be moved while creating. Can also be combined with the two buttons mentioned above!
- Clicking on an empty area opens a dialog in which the exact dimensions of the new object can be entered
2.4 Formatting Area:

1- A path can have surface and/or contour formatting. In the example, the selected (or new) object has a white area, as the area shows here. Note that in the screenshot the area is in front. This is always important if you want to reformat the surface (or the contour). With one click e.g. the surface (and not the contour) of the active object would be colored on a color field.
2- The contour of the marked object is black in the example above. To reformat the contour, use the x key to move it forward and then select the desired color. By pressing the x key again, you bring the contour forward again.
5- The surface or contour that is in the upper area is formatted with color by clicking on this button. Shortcut: (,)
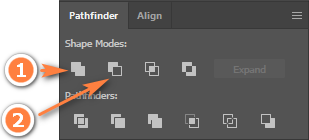
2.5 PathFinder:

Like all windows, the Pathfinder is located in » Window menu. In order to create more complex paths, the combination of different simple basic forms is often useful. The first two functions under Shape Modes are particularly useful for this:
2- Remove overlap area: does exactly that: it cuts the object in front, so to speak, from the rear.
3. Other Features:
- The Layers Window: In Illustrator, vast amounts of paths quickly accumulate. The organization in levels helps to keep the overview. What I have not got used to so far: Basics: The really most important tools and functions: that Illustrator shows all (!) Paths of all (!) Drawing areas in the Layers window and not only those of the currently active drawing area;
- Merge endpoints: the two endpoints e.g. Mark with the direct selection tool, then Object> Path> Merge;
- Have the contour drawn: Object> Path> Contour line;
- Calculate an effect as a path: Object> Convert Appearance;
- Show / hide all operating windows: Tab key;
- Entire canvas: Ctrl / Cmd + 0;
- Switch between normal view / path view: Ctrl / Cmd + y;
- Repeat the last transformation, e.g. after copying an object while rotating: Object> Transform> Transform Again.


0 Comments